
TACS
A TWILIGHT
IMPERIUM 3rd
EDITION (Shattered Empire) PBeM
TACS
A TWILIGHT
IMPERIUM 3rd
EDITION (Shattered Empire) PBeM
|
:: MAIN :: |
:: LARGE MAP :: |
:: SUMMARY :: |
:: POLITICS :: |
|
:: TECHNOLOGY :: |
:: SMALL MAP :: |
:: DISCARDS :: |
:: RULES :: |
::
COMBAT EXAMPLE ::
:: BATTLE
OF EL'NATH ::
:: ORANGE
vs. PURPLE ::
|
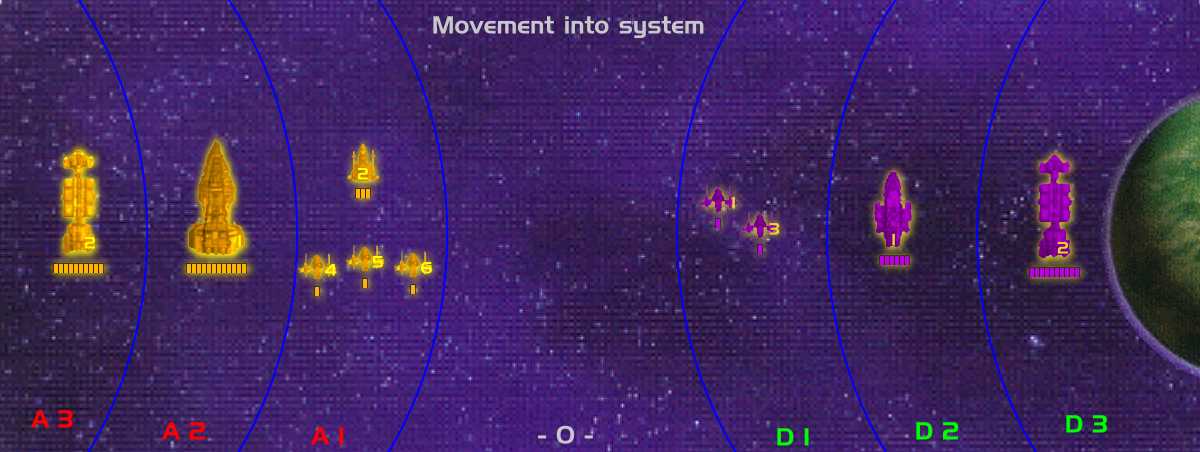
ORANGE activates El'nath
moves 1DN 1DD 1CV (3F) into system |
|
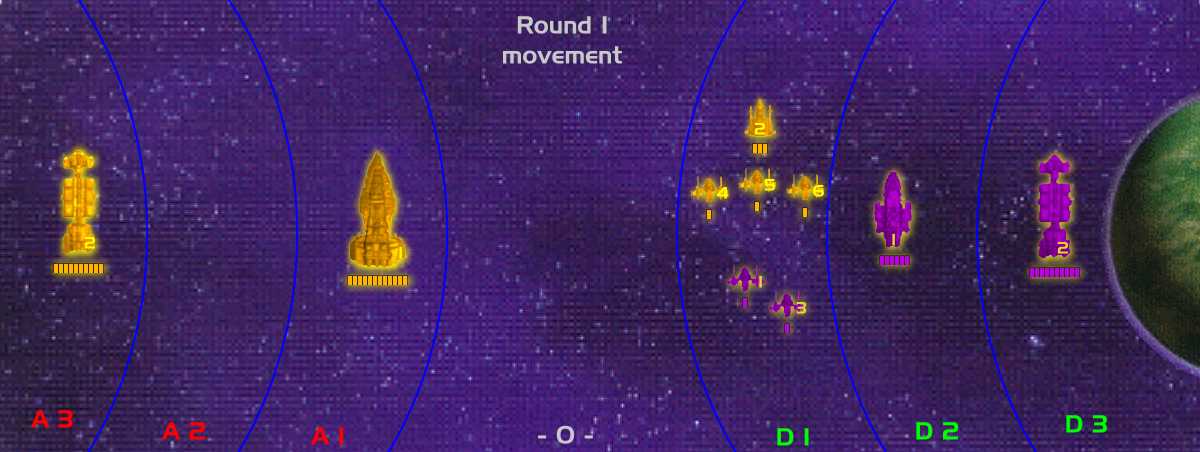
ROUND 1 |
|
|
ORANGE
DN1 to A1 |
PURPLE - no movement - |
|
The Dreadnought has moved 1 zone, which is all the further it can move. The Destroyer has moved 2 zones, which is all the further it can move. The Fighters have also moved 2 zones, which is not their movement limit. However, they cannot pass through a zone containing enemy ships, so they were forced to stop. The Purple player has opted not to move any ships. |

|
ATTACKER |
DEFENDER |
|||||||||||
|
ATT |
DEF |
BAT |
ACC |
POT |
DMG |
|
ATT |
DEF |
BAT |
ACC |
POT |
DMG |
|
DD2 |
F1 |
VL |
5 |
5 |
- |
|
F1 |
F4 |
L |
8 |
4 |
- |
|
F4 |
F1 |
L |
3 |
- |
- |
F3 |
F6 |
L |
9 |
1 |
- |
|
|
F5 |
F3 |
L |
9 |
2 |
- |
CA1 |
DD2 |
M |
5 |
- |
- |
|
|
F6 |
F1 |
L |
9 |
6 |
3 |
|||||||
|
DD2 |
F3 |
L |
5 |
- |
- |
|
||||||
|
DN1 |
F1 |
H |
NA |
NA |
NA |
|
||||||
|
DN1 |
F3 |
H |
7 |
- |
- |
|||||||
|
Purple F1 destroyed. |
|
The six columns on each side are: ATT (attacking ship), DEF (defending/targeted ship), BAT, (size of cannon being used), ACC (die roll for accuracy - Table 8), POT (die roll for potency - Table 9), and DMG (die roll for amount of damage generated).
Since the Orange Fighters and Destroyer are only equipped with Light cannons, they may not fire into adjacent zones. The Dreadnought's Medium cannons are not in range of anything, but the Heavy cannons are in range of the Purple Fighters. This certainly seems to be overkill on the part of Orange. But there is nothing else for the Dreadnought or Destroyer to shoot at, so they may as well shoot at the Purple Fighters. The Purple Cruiser, with cannon equipment of 1 Light and 1 Medium (1L/1M), may fire its Medium cannon into an adjacent zone.
The Orange Destroyer missed with both of its shots, as did Fighter #4. Fighter #5 scored a hit, but it was only a glancing blow, as it wasn't potent enough to get through the armor of Purple Fighter #3. Since it counted as a hit with a roll of 5, by rolling a 9 there was an extra 20% chance of damaging the other fighter, meaning that F5 only needed a 4. The 2 was not enough. Fighter #6 scored a direct hit, incurring 3 damage on Fighter #1. Naturally, this was far more than the Fighter's 1 hit point, so Fighter #1 was destroyed. The Orange Dreadnought also fired at Fighter #1, but by the time the crews maneuvered the heavy cannon into position and fired, the swifter Fighter #6 had already obliterated the target. The Dreadnought's shot, then, was wasted. Both Purple Fighters hit, but neither was potent enough to cause damage. The Purple Cruiser missed with its shot on the Orange Destroyer.
End result: One Purple Fighter destroyed. |
|
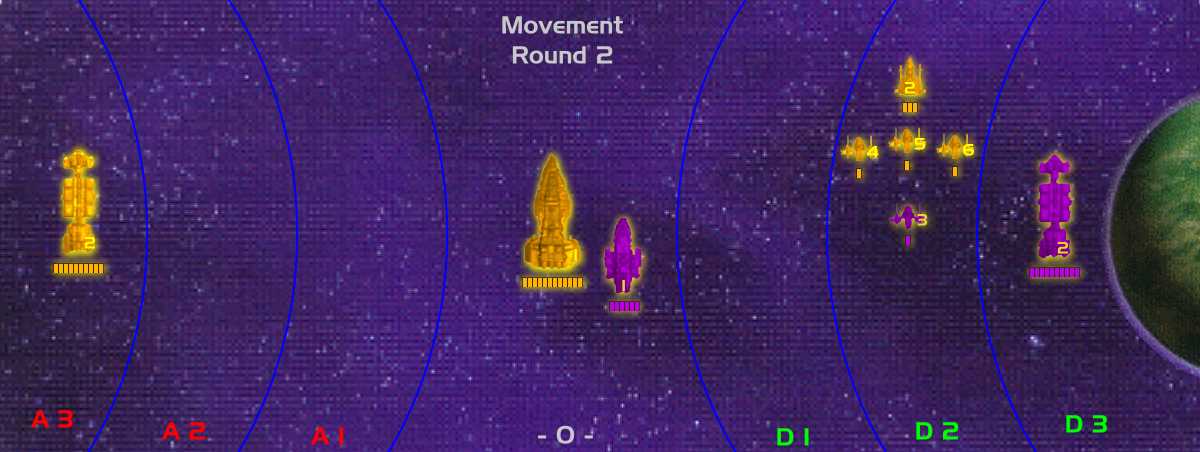
ROUND 2 |
|
|
ORANGE
DN1 to - 0 - |
PURPLE
CA1 to - 0 - |
|
The Orange Dreadnought has moved 1 zone, which is all the further it can move. The Orange Destroyer has moved 1 zone, which is not its movement limit. However, due to the Cruiser's presence in D2 (remembering that attacker movement happens before defending movement), the Destroyer may not proceed any further. The Fighters have also moved 1 zone, their movement hampered by the same restrictions as the Destroyer. After the Orange player has "locked in" his movement, the Purple player decides to move the Cruiser its full 2-zone capacity, which is possible since the Orange player has completely vacated D1 (a possible tactical blunder). The remaining Purple fighter moves into D2 also, to protect the Carrier. The Carrier is not moved, as it is still out of the range of the Orange fleet. |

|
ATTACKER |
DEFENDER |
|||||||||||
|
ATT |
DEF |
BAT |
ACC |
POT |
DMG |
|
ATT |
DEF |
BAT |
ACC |
POT |
DMG |
|
DD2 |
F3 |
VL |
4 |
- |
- |
|
F3 |
F4 |
L |
4 |
- |
- |
|
F4 |
F3 |
L |
7 |
7 |
3 |
CA1 |
DN1 |
L |
8 |
2 |
- |
|
|
F5 |
F3 |
L |
7 |
6 |
2 |
CA1 |
DN1 |
M |
8 |
5 |
3 |
|
|
F6 |
F3 |
L |
10 |
NA |
1 |
CV2 |
DD2 |
M |
1 |
- |
- |
|
|
DD2 |
F3 |
L |
10 |
NA |
3 |
|
||||||
|
DN1 |
CA1 |
L |
1 |
- |
- |
|||||||
|
DN1 |
CA1 |
M |
2 |
- |
- |
|
||||||
|
DN1 |
CA1 |
M |
7 |
8 |
3 |
|||||||
|
DN1 |
CA1 |
H |
4 |
- |
- |
|||||||
|
DN1 |
CA1 |
H |
5 |
- |
- |
|||||||
|
Orange DN1
loses 1 Heavy cannon. (01210) |
|
With five cannons targeting it, Purple Fighter #3 didn't stand much of a chance. Any one of the four cannons that hit it would have destroyed it with one shot. The Orange Dreadnought hit with one of its Medium cannons, needing to roll a 5 to do so. By rolling a 7, its chances of damaging the Purple Cruiser increased by 10% (from a die roll of 5 to a die roll of 4); the 8 was plenty either way. The Cruiser's Hit Points were reduced by 3 (as shown on the graphic); this is within the Medium cannon's range of 2-6. The base value for a Medium cannon - such as the Purple Cruiser had - to damage a ship with Heavy armor - like the Orange Dreadnought - is 6. By rolling an 8, though, the Cruiser increased its chances to damage (its potency) by 15%, putting a roll of 5 just inside the range. Upon taking 3 points of damage, the Cruiser must lose a random cannon. Similarly, upon taking more than 2 points of damage, the Dreadnought must lose a random cannon. The string of five digits to the right of its movement is a current listing of functioning cannons. In the case of the Dreadnought it reads this way: 0 Very Light, 1 Light, 2 Medium, 1 Heavy, 0 Assault. |
|
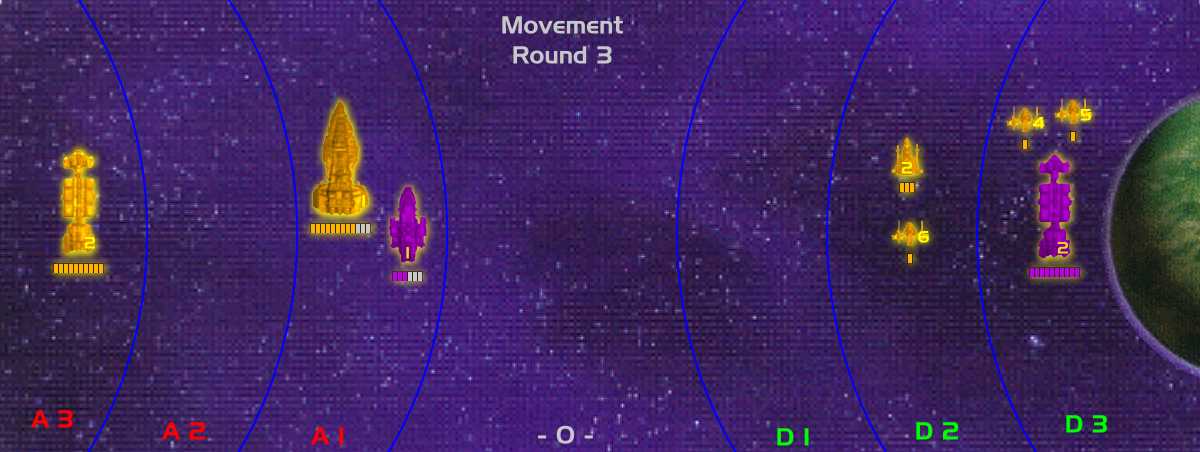
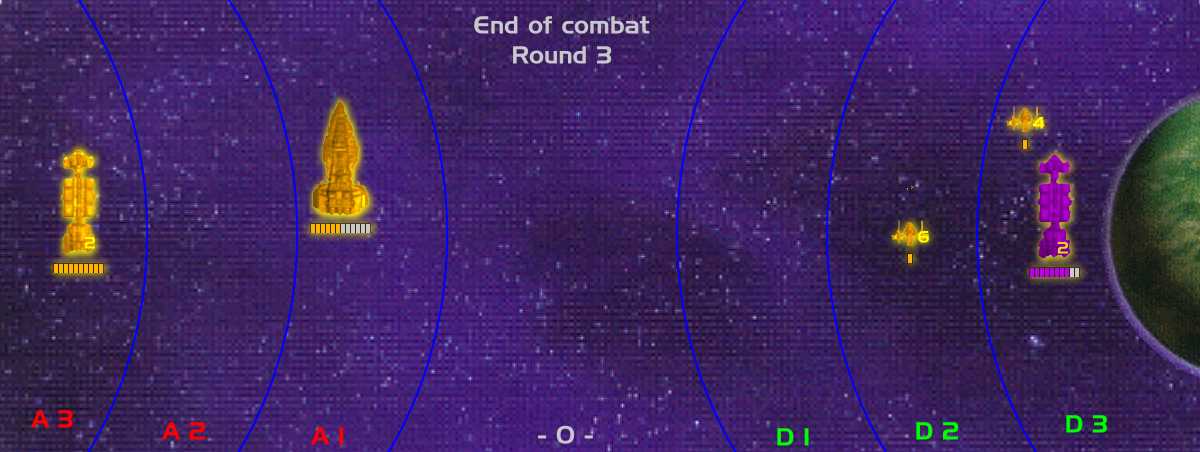
ROUND 3 |
|
|
ORANGE
DN1 to A1 |
PURPLE CA1 to A1 |
|
The Orange Dreadnought regresses one zone in order to protect the Carrier. If it had not done so, the Purple Cruiser could have moved to within one zone of the delicate transport ship. The other portion of the Orange fleet split in half in order to be sure to get some shots on the Carrier. If the Destroyer and all 3 Fighters had moved into D3, the Carrier could have subsequently moved into D2, leading them on a merry little chase across the battlefield. The Purple Cruiser again moves into singular engagement with the Orange Dreadnought, hoping to survive long enough to get a shot in at the Orange Carrier. With only 1 Light cannon remaining, if it wants to have any shots at all, it must move into the same zone with the Dreadnought. |
|
ATTACKER |
DEFENDER |
|||||||||||
|
ATT |
DEF |
BAT |
ACC |
POT |
DMG |
|
ATT |
DEF |
BAT |
ACC |
POT |
DMG |
|
F4 |
CV2 |
L |
7 |
2 |
- |
CA1 |
DN1 |
L |
7 |
8 |
3 |
|
|
F5 |
CV2 |
L |
5 |
7 |
2 |
CV2 |
F4 |
L |
2 |
- |
- |
|
|
DN1 |
CA1 |
M |
10 |
NA |
5 |
CV2 |
F5 |
L |
6 |
7 |
3 |
|
|
DN1 |
CA1 |
M |
2 |
- |
- |
|
CV2 |
DD2 |
M |
8 |
4 |
6 |
|
DN1 |
CA1 |
H |
8 |
7 |
5 |
|
||||||
|
Orange DD2 destroyed. |
|
The battle continues apace. The Orange Dreadnought obliterates the Purple Cruiser, though not without incurring some additional damage from the Cruiser's parting shot. Meanwhile, closer to the planet, the Purple Carrier holds its own, dispatching two enemy ships while only losing 2 hit points. However, it is likely just a matter of time before it is pinned and crushed by the Orange Dreadnought. |
|
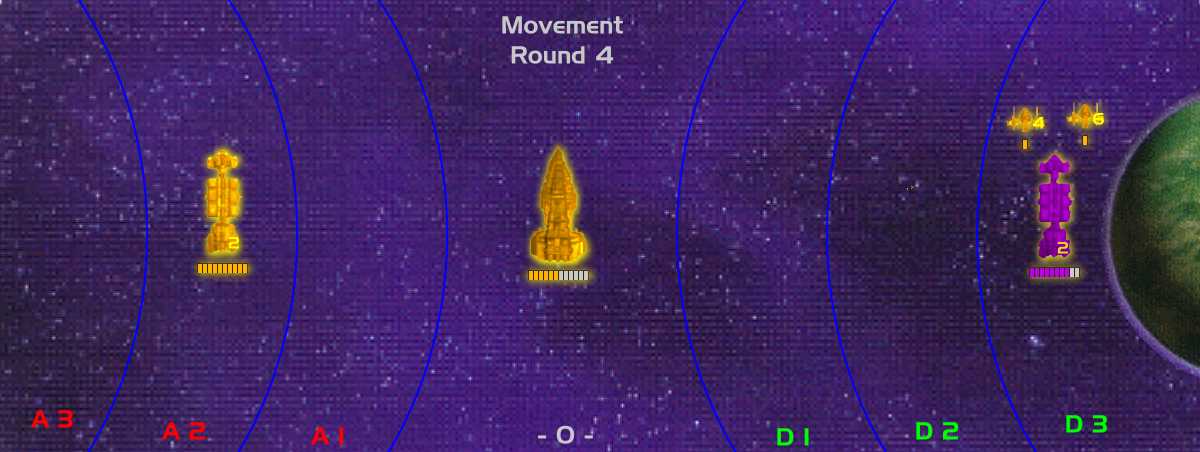
ROUND 4 |
|
|
ORANGE
DN1 to - 0 - |
PURPLE - no movement - |
|
A lull in the fighting as the ships reposition themselves. The Orange Dreadnought and Carrier move in toward the planet. Orange Fighter #6 decides to close in, as well, figuring that the Purple Carrier won't want to move into D2, thereby putting it in range of the Dreadnought's Heavy cannon. He's right. |
|
ATTACKER |
DEFENDER |
|||||||||||
|
ATT |
DEF |
BAT |
ACC |
POT |
DMG |
|
ATT |
DEF |
BAT |
ACC |
POT |
DMG |
|
F4 |
CV2 |
L |
5 |
9 |
2 |
CV2 |
F4 |
L |
2 |
- |
- |
|
|
F6 |
CV2 |
L |
5 |
9 |
3 |
CV2 |
F6 |
L |
3 |
- |
- |
|
|
CV2 |
F4 |
M |
2 |
- |
- |
|||||||
|
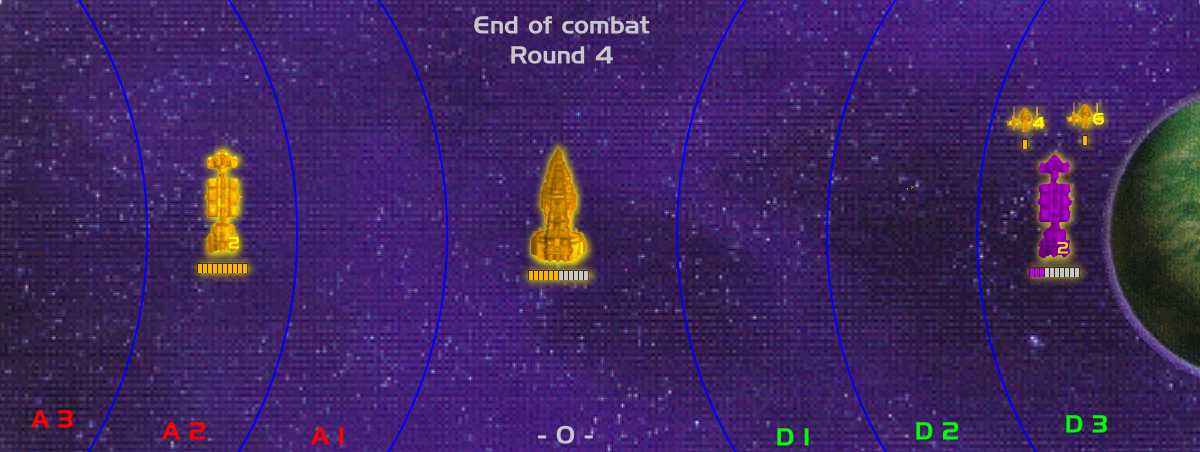
Purple CV2 loses 2 Light cannons. (00100) |
|
A most unfortunate round for the Purple Carrier. All of its shots missed their targets and both of the Orange Fighters scored solid hits. Checking Table 7 in the Rules (Attrition) indicates that upon reaching 3 Hit Points, the Carrier must lose 2 random cannons. |
|
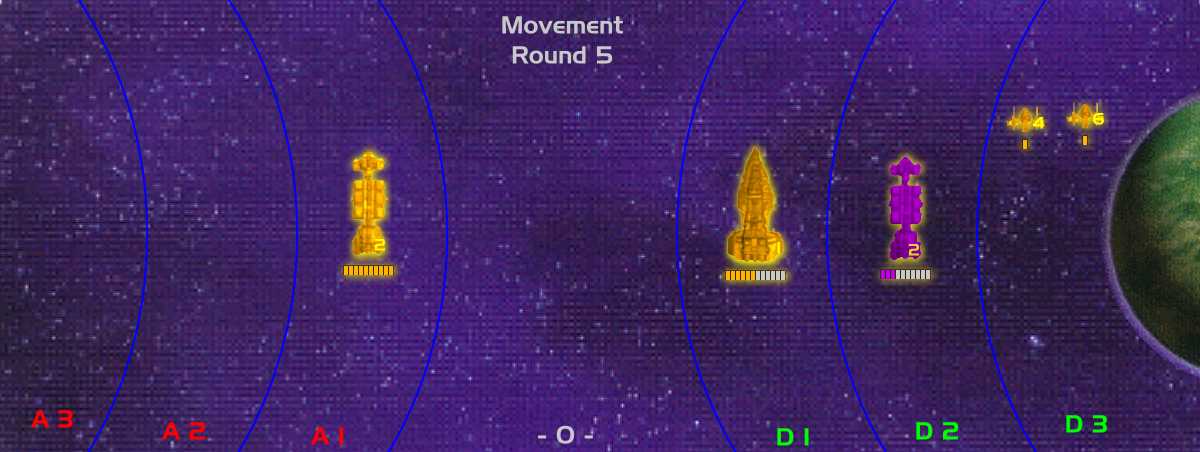
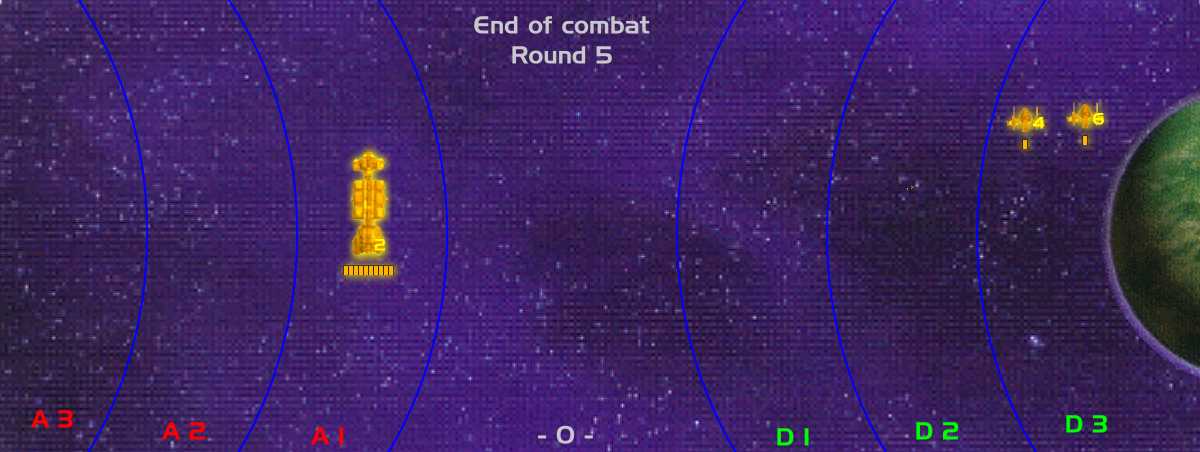
ROUND 5 |
|
|
ORANGE
DN1 to D1 |
PURPLE CV2 to D2 |
|
Knowing it is probably on its last legs, the Purple Carrier moves out to engagement with the Orange Dreadnought, hoping to get a good shot off with the Medium cannon to take it out. It has a decent chance, since the Dreadnought has lost a couple of main weapons. Since the defender declares movement after the attacker, this also gets the Purple Carrier away from the two Orange Fighters and is the only way to avoid getting pummeled from all sides. |
|
ATTACKER |
DEFENDER |
|||||||||||
|
ATT |
DEF |
BAT |
ACC |
POT |
DMG |
|
ATT |
DEF |
BAT |
ACC |
POT |
DMG |
|
DN1 |
CV2 |
M |
5 |
6 |
4 |
CV2 |
DN1 |
M |
4 |
9 |
6 |
|
|
Orange DN1 destroyed. |
|
The Purple Carrier accomplished what it wanted in its death throes, managing to get the most damage out of its final shot against the Orange Dreadnought as they mutually annihilate each other. The Orange Carrier may now progress immediately to the planet and begin the Planetary Landing step of the activation sequence. |