
Tactical
Advantage Combat System
A TWILIGHT
IMPERIUM 3rd
EDITION (Shattered Empire) PBeM
Tactical
Advantage Combat System
A TWILIGHT
IMPERIUM 3rd
EDITION (Shattered Empire) PBeM
|
:: MAIN :: |
|
:: SUMMARY :: |
:: POLITICS :: |
:: BATTLES :: |
|
:: TECHNOLOGY :: |
:: SMALL MAP :: |
:: DISCARDS :: |
:: RULES :: |
:: RULES ::
|
1. Basic rules of Twilight Imperium 3rd Edition, Twilight Imperium: Shattered Empire, and Twilight Imperium 3rd Edition FAQ (v. 2.1) are used, unless stated otherwise (see Optional Rules, House Rules, and Modifications below). 2. The Game Master Overlord (GMO) maintains the official count of all game variables, including, but not limited to, the game board, units, Strategy Cards (including Bonus Counters), Command Counters, Planet Cards, Trade Cards, Trade Goods, millions of barrels of oil exported daily, Technology Advances, Action Cards, Political Cards, nuclear stockpiles, victory points, Public Objectives and Secret Objectives. The GMO also keeps track of all deadlines. 3. All players are encouraged to regularly check all publicly accessible information pertaining to the game. In case of discrepancies players should contact the GMO and ask to correct the mistake. Any problems arising from a player's failure to notice such discrepancies will not be considered a valid reason to back up a game in case of irreversible negative consequences for the player(s) involved. 4. The GMO has final say on all issues. He is, after all, the Game Master Overlord.
The following options will be used: Homeworlds, variant Strategy Cards, Artifacts (altered, see house rules), race-specific Technologies, Space Mines, tactical retreats, Voice of the Council (altered, see house rules). The following options will not be used: Leaders, Sabotage Runs, Shock Troops, Wormhole Nexus, Facilities, Custodians of Mecatol Rex. For details on these, see the appropriate sections of the rulebooks.
1. The Public Objective deck will contain a mix of base game and expansion cards. Imperium Rex will not be included. 2. "Drafting" of systems will be used. Each race will be dealt a hand of tiles. Each player will select one tile and pass the remainder to the player on his left. This process will continue until all tiles have been distributed. 3. All systems will be single planet systems. 4. Artifacts will be attached to empty systems and Special Systems. Placement of these must still follow normal placement rules. 5. There is no plastic limit. A player may build any number of any type of unit. All other unit limits still apply. 6. There is no Trade Goods limit. 7. Leadership secondary is altered as follows: "You may spend influence to purchase Command Counters at the following rate: 1 influence for 1st CC, 2 influence for 2nd CC, 3 influence for 3rd CC, 4 influence for 4th CC, etc." 8. The "Mindstorm" variant for Assembly will be used. Its rules are as follows:
TACS - Tactical Advantage Combat System This game will use the TAC System.
With
this combat system, each planetary system is divided into
"zones". There are three zones for the defender (D1,
D2, D3, where D3 is closest to the planet), three zones for the
attacker (A1, A2, A3, where A3 is furthest from the planet), and one
neutral zone When activating a system that is neutral or undefended by enemy ships or PDS, the player may directly place his ships in any of the three "D" zones. When activating a system in which there is an enemy fleet or PDS within range, the attacker may only place his ships initially in the "A" zones. In this initial placement of ships, Large ships may not be placed in A1. (The different sizes of ships are explained in more detail later.) For each round of combat, each ship may move a number of zones that is equal to or less than their movement rate, as shown below:
For example, a Fighter could move from zone A1 to zone D2 (passing through zone -0-) in one combat round, whereas a Dreadnought could only move from zone A2 to zone A1 in one combat round. IMPORTANT: The attacker moves first, followed by the defender. |
|
Movement exception: A ship may never pass through a zone containing an enemy ship without stopping. |

|
In such a case, movement must stop in the system with the enemy ship, though it may continue forward again in the following combat round. |
|
Each ship has several individual characteristics: size, armor, cannons, and movement. The interaction between these has a variety of unique effects on a Space Battle. The SIZE of a ship affects its chances of being hit by a shot from another ship. The Fighter (VS) is much harder to hit than the War Sun (VL). The table below shows the relative sizes.
The ARMOR of a ship affects its chances of being damaged after being hit by a shot from another ship. Generally speaking, the larger the ship, the heavier the armor it mounts. Therefore, a larger ship is harder to damage.
The CANNONS of a ship are the weapons that are mounted on each ship. There are five sizes of cannons: Very Light (VL), Light, Medium, Heavy, and Assault (only acquired via technology). Each ship has a different combination of these four different cannons.
Each cannon also has a specific range.
Some ships have multiple cannons. These cannons may be aimed individually. A War Sun, for example, has a total of 8 cannons. A War Sun, therefore, can fire at eight different ships or fire eight shots at one ship. And note that only Destroyers and War Suns have Very Light cannons; these take the place of Anti-Fighter Barrage and may only be fired at Fighters (they are too weak to damage anything else). Cannons are considered to fire simultaneously. Combat rolls, though, are performed in order from Very Light to Heavy. All cannons of the same size on both sides are resolved before moving to the next size up. For example, all Destroyers firing Very Light cannons will be resolved first, followed by all Light cannons, and so on. IMPORTANT: Targeting is set before combat rolls are performed. As a ship may be targeted by multiple cannons, it may be destroyed before all of the cannons targeting it have a chance to fire. Also, Heavy and Assault cannons may target ships that they actually cannot fire at (due to there being screening ships in intervening zones); however, if those intervening screening ships are not destroyed by lighter cannons, the shots from those Heavy and Assault cannons will be wasted. Further, if a Heavy cannon or Assault cannon fires through a zone containing a friendly ship, on an accuracy roll of 1 the shot will automatically hit the friendly ship (determined randomly if there is more than one). A potency roll will still be performed on the friendly ship.
HIT POINTS, or how much damage is caused by a certain shot, is the final variable. Each cannon can produce damage within a certain range.
And each ship can absorb a certain amount of damage (or, has a certain Hit Point Value).
A ship loses cannons as it takes more and more damage. This is done proportionally: If a unit loses half of its hit points, it will lose half of its cannons. Which cannons are lost is randomly determined, with the exception of the Destroyer, which will always lose its Very Light cannons first. Lost cannons are assessed at the end of a combat round. The following table assumes ships unmodified by technologies.
Example: A Dreadnought starts off with 12 hit points and 5 cannons. Once a Dreadnought's hit points reach 10 or less, it will lose one of those 5 cannons (randomly determined). When its hit points reach 8 or less, the Dreadnought will now have only 3 of its original cannons remaining, and so on.
Each combat round of a Space Battle has three steps:
When evaluating combat between two ships, the size, armor, cannons, and hit points of a ship all have an effect. There are up to three die rolls that need to be made to determine how successful a shot from another ship is:
[Combat rolls generally follow the same rules as normal combat in TI3: A roll is considered successful if it is equal to or greater than the combat value.]
Examples:
A Light cannon (from a Fighter, Destroyer, or Cruiser) will always
be able to hit a War Sun.
Examples: After scoring a hit, a Light cannon (such as from a Fighter) will only have a 40% chance of damaging the heavily-armored Dreadnought or War Sun. A Heavy cannon (such as from a War Sun) will have a 90% chance of damaging a lightly-armored Fighter. IMPORTANT MODIFICATION: Every number over the accuracy value of a cannon increases the potency by 5%. An accuracy roll of 10 will automatically damage. For example, if a Fighter (with a Light cannon) attacked a Dreadnought (with Heavy armor), it would need a 2 to score a hit. If the Fighter were to roll a 4, it would have a 10% higher chance of damaging the Dreadnought (5% for each number over the 2). In this case, the Fighter would only need a 6 to roll for damage. Finally, after determining whether damage has occurred, a die is rolled (depending on the cannon - see Table 5) and the resulting amount of damage is subtracted from the ship's current hit point total. After these steps are performed with all ships participating in the battle, the next round commences with the movement step. For an example of a full Space Battle with the TACS, click here. Following the battle, the winning fleet may freely rearrange their ships inside the defensive zones.
Retreats do not have to be announced. Any time any ship is in one of the Attacker zones and there are no enemy ships further from the planet, it may perform a retreat during the Movement step. Ships may retreat individually and may retreat to multiple systems, though normal activation rules still apply (including Tactical Retreat option). The same rules apply to both attacking fleet and defending fleet.
The following changes are made to the PDS unit:
All other rules pertaining to the PDS (such as its method of being transported) remain the same.
Planetary Landings may occur anytime during a Space Battle, assuming a ship containing a Ground Force is present in zone D3. The ship may continue to fire and be fired upon as the Ground Forces depart for the planet below. If a PDS is present on the planet, it may choose to fire once at the carrier(s) (regardless of friendly ships present in zone D3 - the carrier is considered to be the ship closest to the planet) or twice at any Ground Forces that are landing. Selection of Ground Forces to be fired on is made by the enemy.
The following rules apply to bombardment:
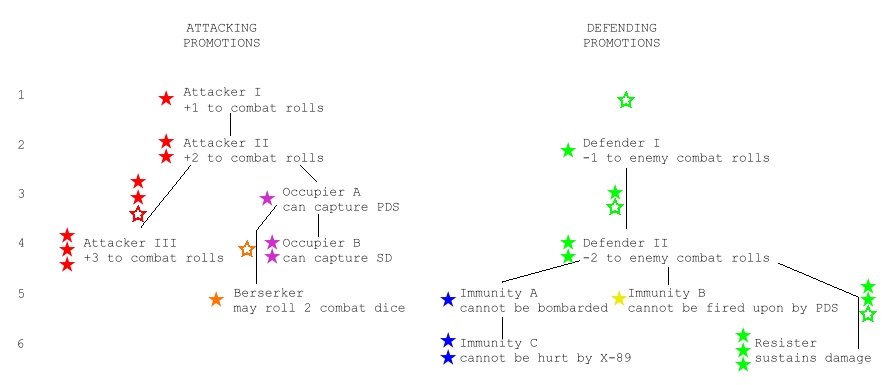
INVASION COMBAT and PROMOTIONS Invasion Combat works in much the same way as the manual states. Combat values for the Ground Force unit remain the same. The only difference in the way Invasion Combat is processed is that each Ground Force may choose to target a specific enemy Ground Force. This is possible since each Ground Force is uniquely numbered, much like the ships. This is relevant since a Ground Force, upon destroying an enemy Ground Force unit, may be promoted. Each "kill" (destruction of an enemy Ground Force) enables a particular unit to work toward gaining promotions, which enhance various abilities of the unit, as detailed in the table below. These promotions are put into effect immediately. This means that if a Ground Force gains a successful kill in Round 1 of Invasion Combat, his promotion may be put into effect for Round 2 of that Invasion Combat.
A
roll of 10 is considered a "double promotion", meaning
simply that the Ground Force receives two promotions.
The column of numbers to the left is number of kills to attain to each particular promotion. A hollow star indicates that two kills are needed to reach a certain level. Example: A Ground Force rolls a 9, notching a successful kill. At the end of the combat round (assuming the Ground Force survives), he has two options for promotions: Attacker I, or taking a step toward Defender I. If he selects Attacker I, that Ground Force unit's combat value is now 7. The number of kills required for a promotion is cumulative, building on the promotion before it. Example: If a Ground Force unit already has the Attacker II promotion, he only needs 1 more kill to attain the Occupier A promotion; 3 total kills would be required, not 3 additional kills. However, if a Ground Force unit already has the Attacker I promotion, he will still need 2 more kills to attain the Defender I promotion. Here is an example of a totally tricked-out Ground Force unit (all promotions attained):
This unit will:
But he's earned it: To accomplish this, he has notched 17 kills (or spent a very long time on Hope's End).. |
||||||||||||||||||||||||||||||||||||||||||||||||||||||||||||||||||||||||||||||||||||||||||||||||||||||||||||||||||||||||||||||
|
The technology tree has been heavily modified. There are four new techs; some techs have been reworded to accommodate the TACS; some techs have been moved to different places on the tree, or have different prerequisites. There is a link to the tech tree at the top of this page. New technologies:
Enhanced
Armor (red) - Your
ships gain additional hit points. Reworded technologies:
Advanced
Fighters - Also have 1 additional hit point. Adjusted prerequisites:
Automated
Defense Turrets is now the base red tech. Race-specific technologies:
Bioptic
Recyclers (Winnu)
- At any time, you may discard 1 Action Card to receive 2
Trade Goods or 1 Command Counter. |
|
The six races present in this game are: L1z1x, Mentak, Muaat, Sol, Winnu, and Yin. Adjustments in their race sheets as follows: Starting Technologies: All races who normally start with Hyler V Assault Laser start with Automated Defense Turrets instead. Muaat starts with Automated Defense Turrets instead of Sarween Tools. L1z1x -
Mentak -
Muaat -
Yin -
|
|
There are several adjustments to the Action Card deck. Some cards are new, some cards have been slightly reworded to accommodate the TACS, and some quantities have been adjusted. The changes are as follows: New cards (TACS):
Revised cards (TACS):
Revised cards (Mindstorm):
Removed cards:
|
|
A step is inserted between (b) Repair damaged ships and (c) Remove Command Counters:
|
Twilight Imperium 3rd Edition PBeM
web site design
b, 2005
